|
If you would like to speak with one of our engineers, please Submit a Question or give us a call at the phone number here. In North America, To route your phone support request directly to a technical support engineer, call toll-free 1-888-382-1583 or 1-440-646-3434, select Option 3 (Technical Support), then select Option 5 (More Options). When prompted, enter the ThinManager Direct Dial Code 201. |
Difference between revisions of "IFIX and Terminal Services"
Randycannady (talk | contribs) (→Disable DEP (Data Execution and Prevention)) |
|||
| Line 34: | Line 34: | ||
IFix requires the Relaxed Security setting. This can be applied by opening the '''Terminal Services Configuration''' console by selecting '''Start > Programs > Administrative Tools > Terminal Services Configuration'''. Select the '''Server Setting''' folder and change the '''Permission Compatibility''' setting to '''Relaxed Security'''.<br> | IFix requires the Relaxed Security setting. This can be applied by opening the '''Terminal Services Configuration''' console by selecting '''Start > Programs > Administrative Tools > Terminal Services Configuration'''. Select the '''Server Setting''' folder and change the '''Permission Compatibility''' setting to '''Relaxed Security'''.<br> | ||
<center>[[File:Ifix2.png|Terminal Services Configuration – Server Settings]]<br>''Terminal Services Configuration – Server Settings''<br></center> | <center>[[File:Ifix2.png|Terminal Services Configuration – Server Settings]]<br>''Terminal Services Configuration – Server Settings''<br></center> | ||
| − | ===Disable DEP (Data Execution | + | ===Disable DEP (Data Execution Prevention)=== |
The DEP may need to be disabled for the terminal server to recognize USB license keys. The iFix documentation says: | The DEP may need to be disabled for the terminal server to recognize USB license keys. The iFix documentation says: | ||
<pre style="white-space: pre-wrap; | <pre style="white-space: pre-wrap; | ||
Revision as of 20:06, 6 November 2012
Contents
Introduction
iFix is a SCADA (System Control and Data Acquisition) software. It was developed by Intellution and is now part of the GE Fanuc Proficy series of industrial software.
This Wiki Article is a simplified deployment guide for ThinManager users. Although it was prepared with the help of iFix users and specialists, it is a mere aid and not the definitive source for information. Please refer to official iFix documentation for questions and details.
A special thanks goes to Scott Crider of Advantage Industrial Automation.
Topics
- Network Configuration
- Deployment Choices
- Microsoft Pre-planning
- iFix Installation
- iFix Licensing
- iFix System Configuration
- Profile Manager
- Launching from within ThinManager
- Additional Microsoft Configurations
Network Configuration
IFix is designed to pull data out of PLCs and factory-level sensors, present the data in a form usable by humans, and save the data for further usage. iFix is designed to function with a “two-box” system.
- The first box is a SCADA (Systems Control And Data Acquisition) computer. This is a PC that gathers the I/O and data from the PLCs and machinery and runs the iFix database. This computer provides the data and values to the system.
- The second box is a View Node. This is a computer that pulls the data from the SCADA node and displays it on screens for the operator.
In a terminal services environment the terminal server acts as the View node. Each client that connects to a terminal server will start a session and launch a view node within the session. The sessions on the terminal server run the operator screens populated with data from the SCADA node.
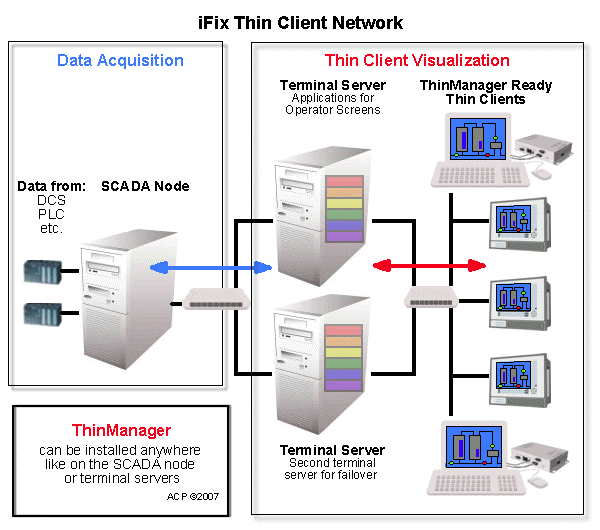
Sample iFix Network with Thin Clients
In a ThinManager system dual terminal servers can be setup to provide redundancy and failover. This allows the operator screens to keep running with current data if a terminal server fails.
Deployment Choices
How iFix will be deployed and used influences how iFix is
- Generic Deployment Model– All users use a common SCU file to launch a commonly configured application.
- Specialized Deployment Model – Each user runs a unique environment and each user requires a specially configured SCU file.
This article will assume a generic deployment but will point out where changes need to be made to deploy a specialized configuration.
The generic deployment can be designed to launch a Main Menu with navigational buttons to allow the user to select the needed screens or the welcome screen can have scripts added that launch the desired screens based on the node name of the client.
Consult your iFix documentation for details.
Microsoft Pre-planning
There are a few configuration changes that iFix may require on the Microsoft operating system, especially if legacy applications are needed to be upgraded to run on the new system. Consult your iFix documentation for details.
Relaxed Security
IFix requires the Relaxed Security setting. This can be applied by opening the Terminal Services Configuration console by selecting Start > Programs > Administrative Tools > Terminal Services Configuration. Select the Server Setting folder and change the Permission Compatibility setting to Relaxed Security.
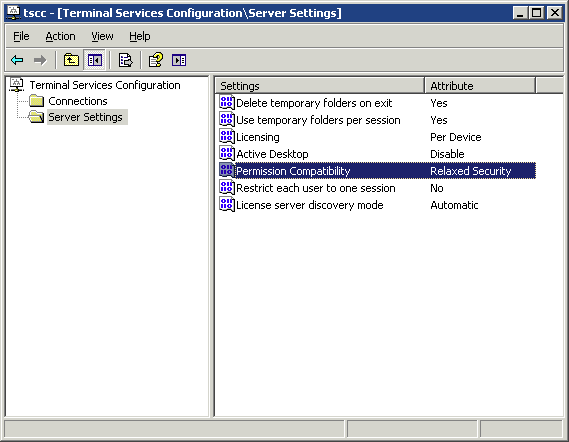
Terminal Services Configuration – Server Settings
Disable DEP (Data Execution Prevention)
The DEP may need to be disabled for the terminal server to recognize USB license keys. The iFix documentation says:
“iFIX Does Not Start After Install Due to DEP Access Restriction (Proficy HMI/SCADA – iFIX Release Notes   VERSION 4.0)
“When you start iKeyDiag or iFIX 4.0 for the the first time, an access violation may occur. You will not be able to start iFIX. This can occur due to hardware enforced DEP (Data Execution Protection) settings within Windows Server 2003 SP1 or Window XP SP2. To remedy this issue, you can selectively add the iFIX program to the DEP exception list or shut down the feature. iFIX will then run normally. For more information, refer to "DEP Support Statement For GE Fanuc Products Using Proficy Common Licensing" article on the GlobalCare site for more information:
http://globalcare.gefanuc.com/kc/kb/glbCarekbinfo.asp?objid=1553203&id=268450132 ”
- iFix Documentation
Right Click on the My Computer Icon and choose Properties. Select the Advanced tab, then the Settings button in the Startup and Recovery section. Select the (manual) Edit button on the Startup and Recovery Properties Window.
Set the bootloader information to:
[boot loader]
timeout=30
default=multi(0)disk(0)rdisk(0)partition(1)\WINNT
[operating systems]
multi(0)disk(0)rdisk(0)partition(1)\WINNT="Windows Server 2003, Standard" /fastdetect /NoExecute=alwaysoff
Application Compatibility Script
The following information is from the iFix e-books under Installing and Configuring iFIX with Windows Terminal Server. Also as a separate Document, it can be found at:
C:\Program Files\GE Fanuc\ProficyDoc\1033\iFIX\TM.CHM
Before you begin installing and configuring iFIX on a Terminal Server, it is recommended that you complete the following Windows administrative tasks:
- Run chkroot.cmd from the C:\Windows\Application Compatibility Script folder. This creates the RootDrv2.cmd file.
- In Notepad or another text editor, open the RootDrv2.cmd file from the C:\Windows\Application Compatibility Script folder. At the end of the file, on the Set RootDrive= line, add a driver letter. For example: Set RootDrive=W:
- Save the RootDrv2.cmd file.
- Run the RootDrv2.cmd file.
- Verify that your Terminal Server is set up and functioning.
iFix Installation
The iFix software, like all software, should be installed on a terminal server in the Install Mode. Do this by selecting Start > Settings > Control Panel > Add/Remove Programs > Add New Programs and follow the installation wizard.

Terminal Services Installation Warning
A warning will be displayed if you try to install on a terminal server without using the Add/Remove Programs function.
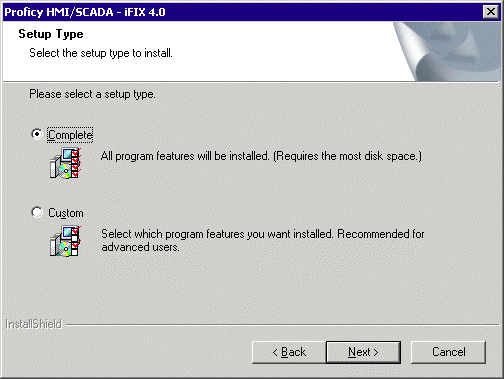
Setup Type Window
During the install a Setup Type window will be displayed.
The Complete selection is the normal choice unless the install is going to run Fix32 graphics using the Fix Desktop.
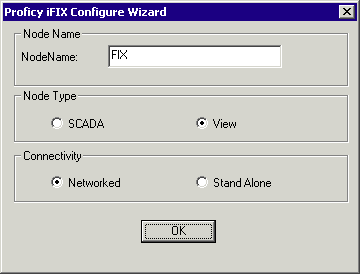
Proficy iFix Configure Wizard
Proficy iFix Configure Wizard allows the terminal to be configured as a View Node. It also will be Networked, as shown in the picture.
The SCADA radio button will be selected when installing the SCADA node of the system.
The NodeName can be left as the default.
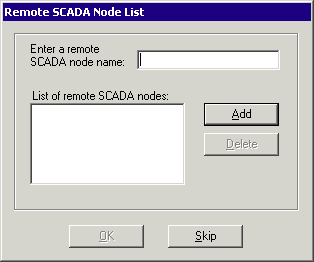
Remote SCADA Node List
The Remote SCADA Node List allows the SCADA nodes to be identified. This can be done now or later in the SCADA section of the Systems Configuration Utility.
Restart after Installation
Do not do an automatic restart at the end of the installation on a Windows 2003. Instead let the installation finish and then restart the computer manually. This allows the completion of the full install.
iFix Licensing
The iFix installation on the terminal server should be licensed before configuration begins. Consult your iFix documentation for details.
The License Viewer can be launched by selecting Start > Programs > Proficy Common > License Viewer.
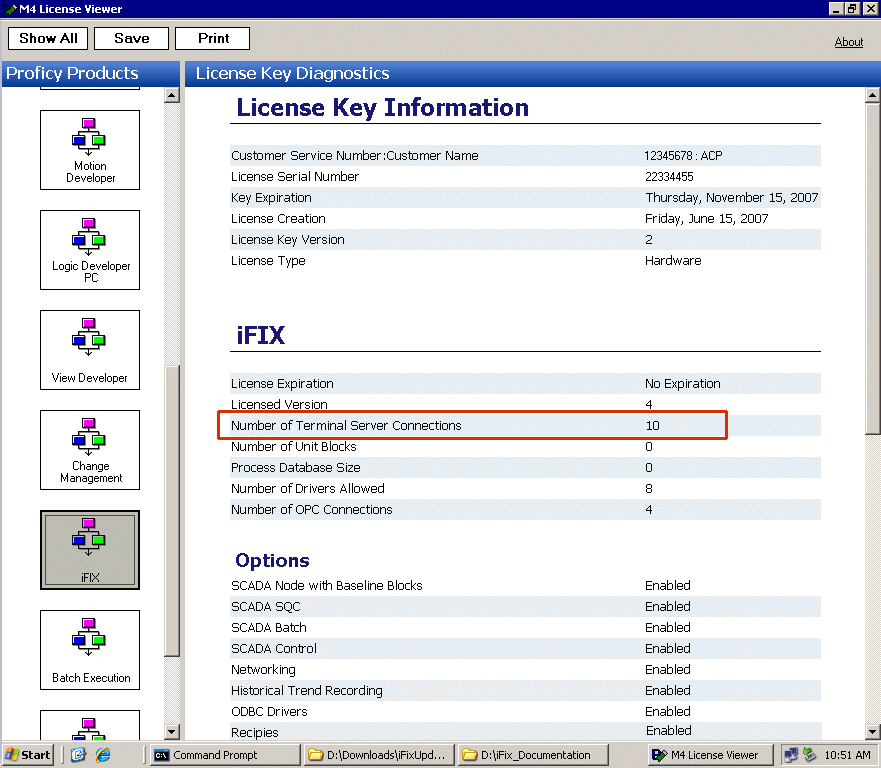
License Viewer
The Proficy License Viewer will display the number of terminal connections that the license allows along with other details.
Virtual Keyboard
iFIX provides a virtual keyboard that allows you to work in touch-screen environments or to use a mouse to enter passwords and other data. Install the virtual keyboard on the terminal server to make it available to each client licensed for iFIX.
To install the virtual keyboard:
- Double-click the LICENSE.EXE file in the Proficy iFIX directory on your terminal server. The IMG License Manager dialog box appears.
- Click Install Service to install the virtual keyboard licenses.
- Click Administration Options & Help. The Terminal Server Administration Option dialog box opens.
- Click Copy Global Settings to All User Folders, then click Yes to confirm.
- Click OK to return to the IMG License Manager dialog box.
- Click Start Service to activate the virtual keyboard for all licensed clients.
iFix System Configuration for Terminal Services
iFix is configured with the System Configuration Utility (SCU). The SCU tool allows the selection of startup options and file directories.
In iFix 3.0 and earlier, each terminal server user had to have a separate SCU (System Configuration Utility) file to allow each user to launch a unique instance of the program. The System Configuration Utility could be run once, then copied into a folder for each user. An additional IP address was need per session.
In iFix 4.0, a Profile Manager speeds the configuration process by allowing user settings to be based on the original configuration.
- If deploying using the Generic Deployment model create one SCU file in the SCU program and then use the Profile Manager to define the additional nodes.
- If deploying using the Specialized Deployment model create a SCU file for each node to define to program.
Launch iFix
The first step to configuration is verifying that iFix was installed properly and will run. Launch the iFix workspace by selecting Start > Programs > Proficy HMI SCADA – iFix 4.0 > iFix 4.0. It will launch the Proficy iFix Startup program.
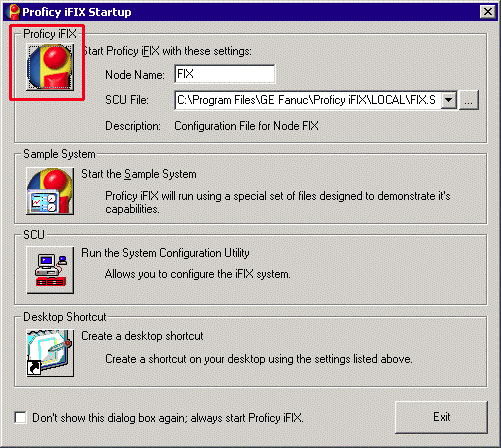
Proficy iFix Startup Window
Select the icon in the Proficy iFix section to launch the workspace to make sure that iFix will run.
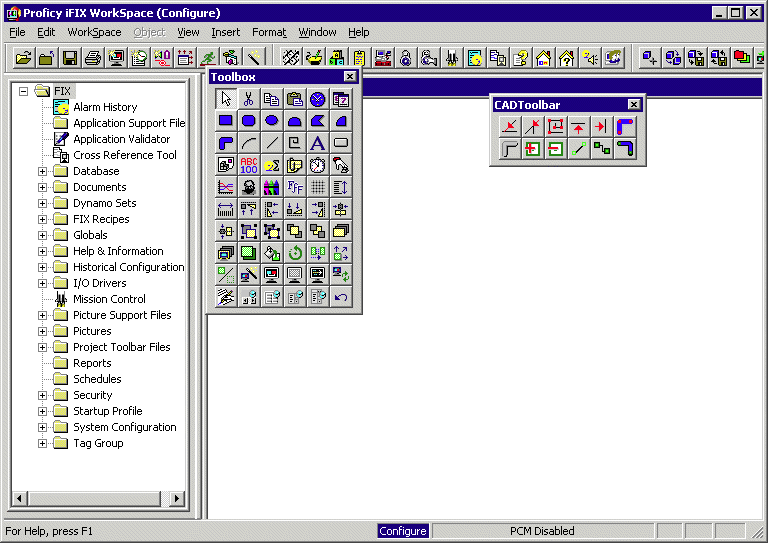
iFix Workspace
Once you have verified that the iFix workspace will run it can be closed.
Launch the SCU tool by selecting Start > Programs > Proficy HMI SCADA – iFix 4.0 > System Configuration. It will launch the Proficy iFix Startup program.
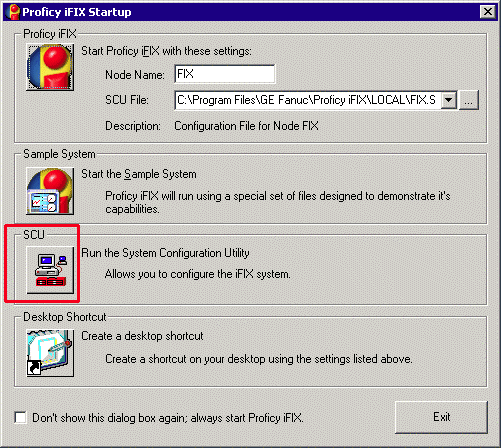
Proficy iFix Startup Window
Select the icon in the SCU section to launch the SCU tool.
An iFix System Information window will be launched to allow the path to the SCU files to be chosen.
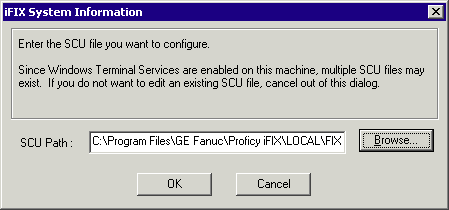
iFix System Information
The default path is normally fine. Select the OK button to proceed.
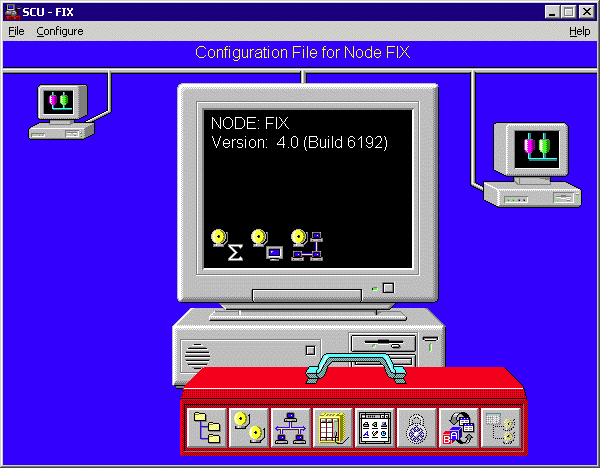
System Configuration Utility
The System Configuration Utility (SCU) allows the components of the project to be defined.
SCADA Configuration
SCADA node configuration is managed by selecting Configure > SCADA… in the System Configuration Utility (SCU) to launch the SCADA Configuration.
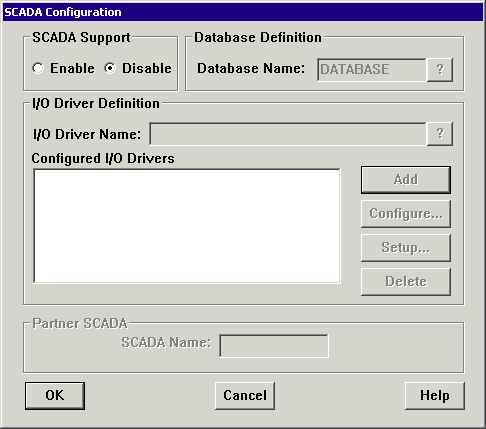
SCADA Configuration
The terminal server is not a SCADA node so the SCADA Support should be disabled on the terminal server. The other features will be grayed out.
When configuring the SCADA node the SCADA Support is enabled and the database and I/O drivers can be defined.
Select OK to accept the configuration.
Path Configuration
Select Configure > Paths in the System Configuration Utility (SCU) to configure the file locations.
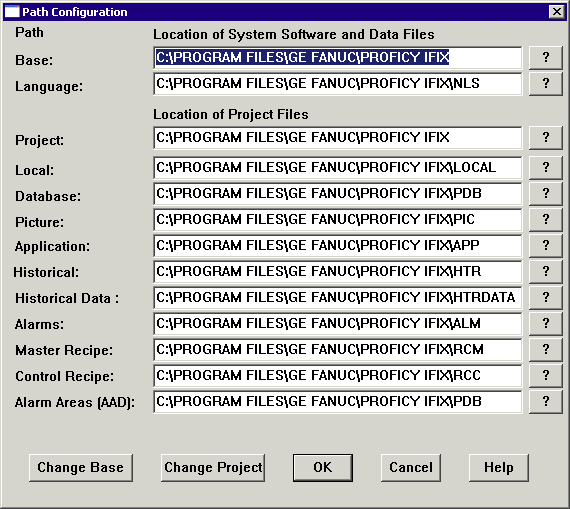
Path Configuration
The defaults are usually fine for the Generic Deployment Model.
If this system will use the Specialized Deployment Model then the Local path will need to point to where the SCU file will be stored.
Network Configuration
Select Configure > Network in the System Configuration Utility (SCU) to configure the network.
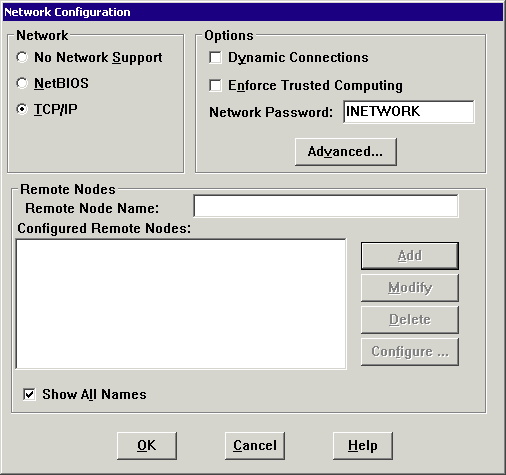
Network Configuration
The Network configuration window allows the network and SCADA nodes to be defined.
Select the TCP/IP radio button for the Network.
The SCADA servers are defined by entering their name in the Remote Node Name filed and selecting the Add button.
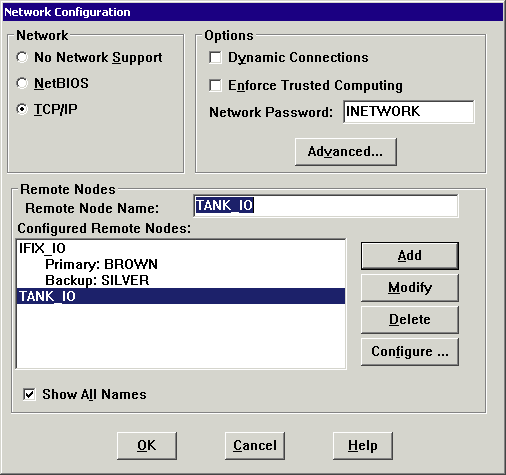
Defined SCADA Nodes
If a SCADA node has a backup SCADA server it can be defined by highlighting the SCADA node and selecting the Configure button.
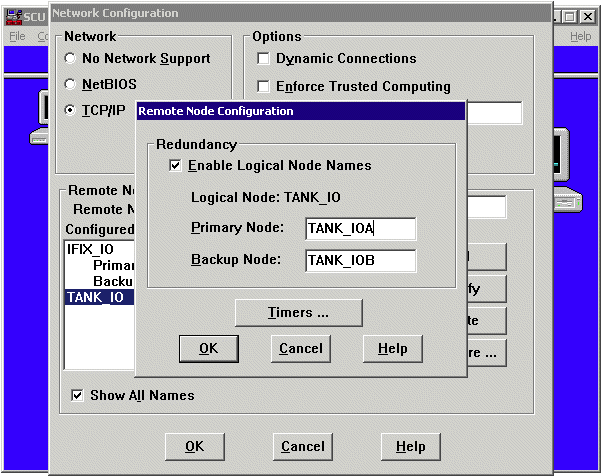
Remote Node Configuration
The Primary and Backup SCADA servers that make up the node can be entered to form a logical node. Select OK to accept changes.
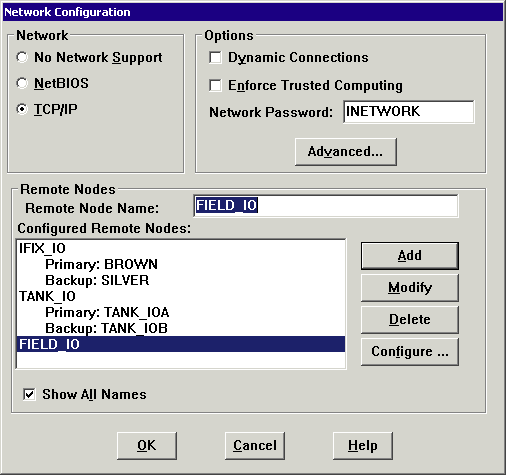
Configured Remote Nodes
When all the SCADA nodes used by the View nodes are defined select OK to accept the changes. Save the SCU file by selecting File > Save or using CTRL+S.
Note: Saving the SCU file is important.
Profile Manager
Once a SCU file is created and saved it can be applied to many nodes with the Profile Manager.
Note: The Windows user accounts must be created before configuring users in the Profile Manager.
iFix must be running to launch Profile Mananger. Select Start > Programs > Proficy HMI SCADA – iFix 4.0 > iFix 4.0 to launch the Proficy iFix Workspace.
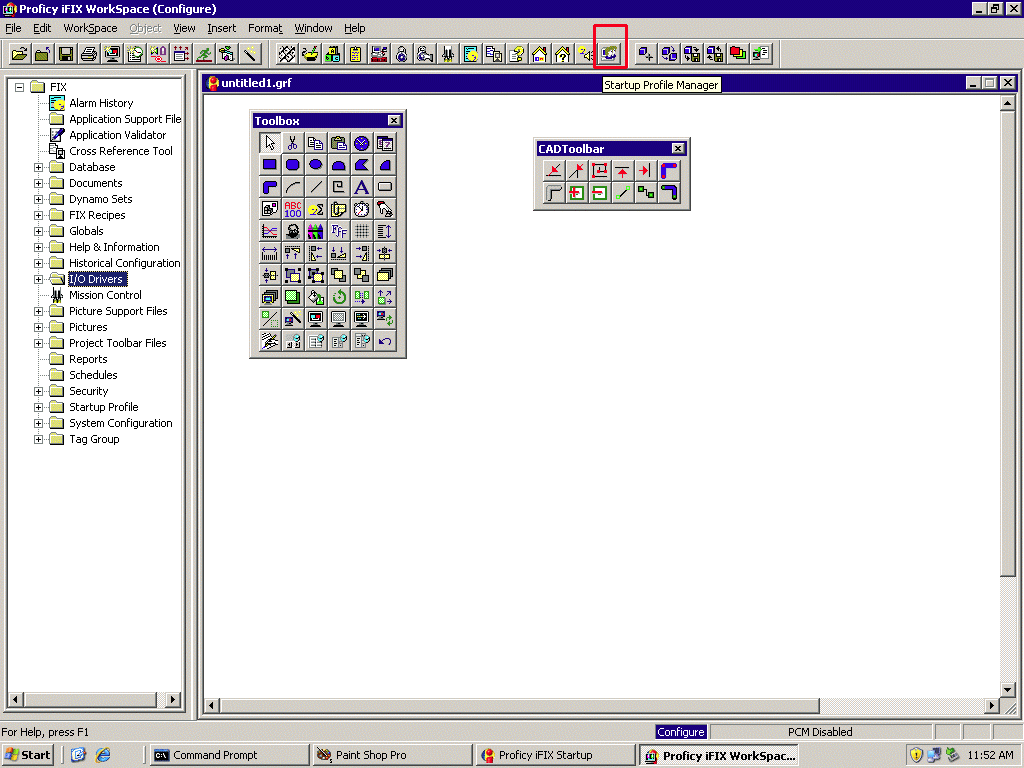
iFix Workspace
Launch Profile Manager by selecting the Profile Manager icon on the menu or by selecting Start > Programs > Proficy HMI SCADA – iFix 4.0 > Startup Profile Manager.
Profile Manager Button
The Profile Manager button shows two heads in profile against a monitor.
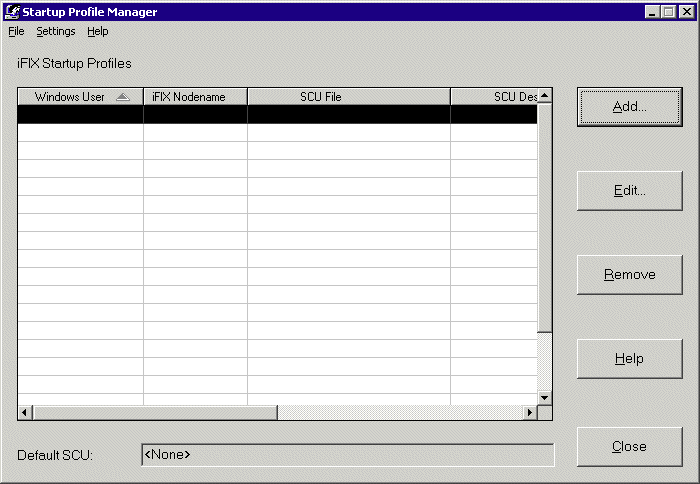
Startup Profile Manager
The Startup Profile Manager lists the defined profiles. Select the Add button to configure a profile.
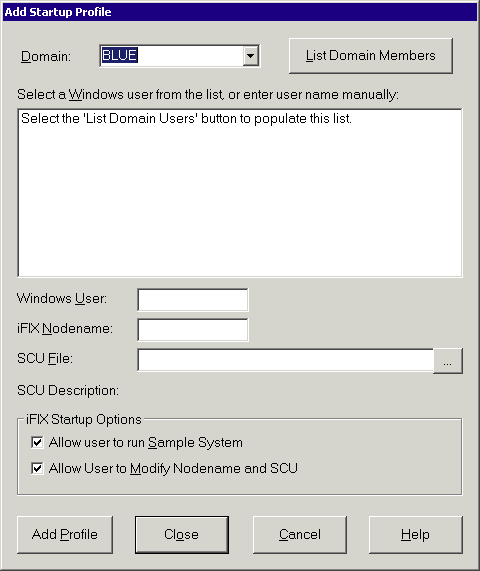
Add Startup Profile
Enter the user information in the Add Startup Profile window.
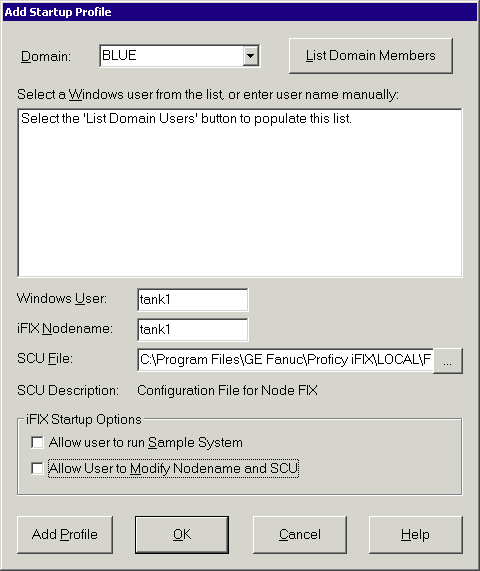
Configured User
Enter the Windows user account that the node will use in the Window User field.
Enter the iFix node name in the iFix Nodename field. This can be the ACP ThinManager thin client’s name.
Select the SCU file that the user will use by selecting the button with three periods. The same SCU file will be used if using the Generic Deployment Model while a different SCU file will be used for each user when using the Specialized Deployment Model.
Unselect the Allow user to run Sample System and the Allow User to Modify Nodename and SCU checkboxes.
Select Add Profile to accept the changes.
Create a profile for each terminal.
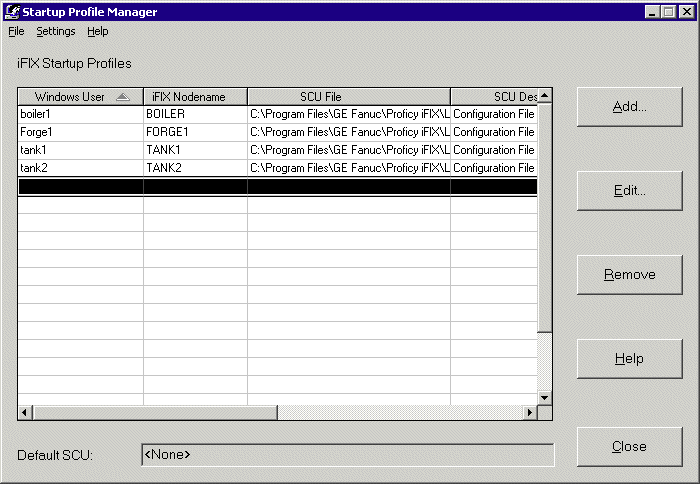
Profile Manager
The Profile Manager will list the configured nodes with their Windows user name when finished.
Launching from within ThinManager
ThinManager can be configured to launch the iFix program automatically. Full details are available in the ThinManager Category of this Wiki.
- First create an AppLink Display Client for the iFix Launch program.
- Second, add the iFix Display Client to the terminal and enter a username and password on the Login Information page.
Configuring a Display Client with iFix
Right click on the Terminal Services branch of the Display Clients in the ThinManager tree and select Add Display Client.
- Name the Display Client.
- Select the Application Link checkbox on the Terminal Services Display Client Options page.
- Add the terminal servers with iFix installed on the Display Client Members page.
- Add the path to the iFix Launch program in the Program Path and Filename field of the AppLink page.
The default path is C:\Program File\GEFanuc\Proficy iFix\launch.exe.
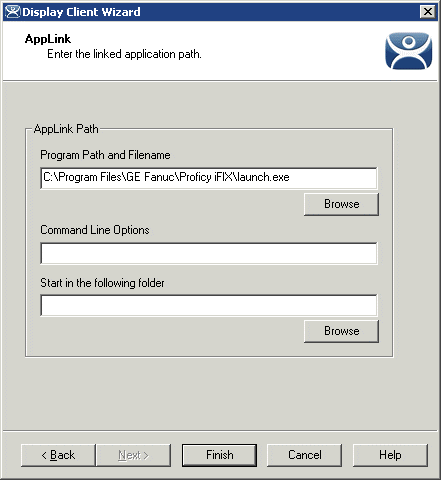
AppLink Page with iFix Launch in Path
This configures iFix to run when the Display Client is launched.
Configuring a Terminal to use the iFix Display Client
The terminal needs to be configured to automatically login and use the iFix Display Client.
- Open the Terminal Configuration Wizard for the desired terminal by double-clicking on it in the ThinManager tree.
- Select the Use Display Clients checkbox on the Terminal Mode Selection page.
- Add the iFix display client to the Selected Display Client List on the Display Client Selection page.
- Add a valid user name and password on the the Log in Information page of the wizard.
- Select Finish and turn on the terminal.
When the thin client boots it will automatically login to the terminal server and launch iFix with the configuration that was defined by the SCU specified in the Profile Manager for that user.
Hide the Startup Screen
Once the system is setup and the users and node are configured the Proficy Startup screen can be turned off so that iFix launches without displaying this window and making the user select iFix from the Startup window. Open the Startup windows by selecting Start > Programs > Proficy HMI SCADA – iFix 4.0 > iFix 4.0. It will launch the Proficy iFix Startup program.
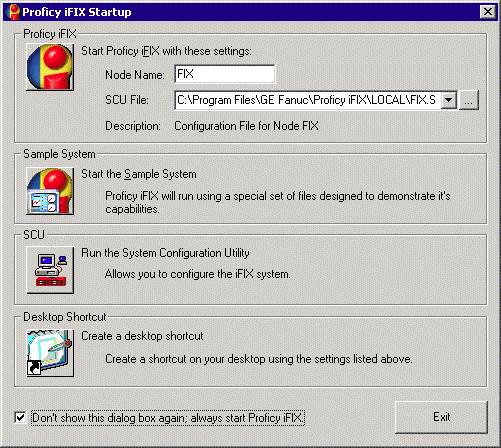
Proficy iFix Startup
Check the Don’t show this dialog box again; always start Proficy iFix checkbox. This will launch iFix without requiring the user select iFix from the Startup window.
Additional Microsoft Configurations
There are a few Microsoft tweaks that will make the system more efficient. This is a guide. Please refer to iFix and Microsoft documentation for details.
Add Users to Remote Desktop Group
User accounts for terminal servers need to be added to the Remote Desktop Users group in Windows. Open the Computer Management console by selecting Start > Programs > Administrative Tools > Computer Management.
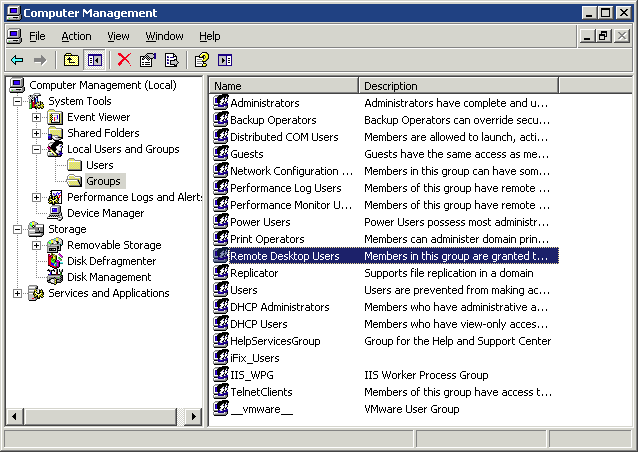
Computer Management Console
Highlight System Tools > Groups and double-click on the Remote Desktop Users group to launch the properties window.
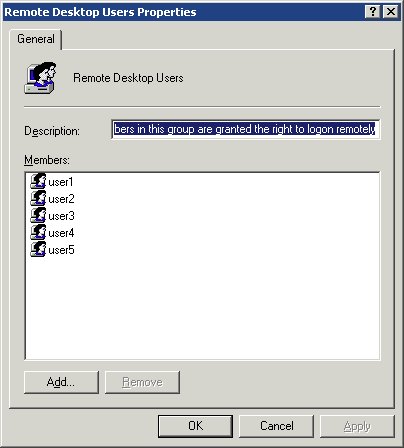
Remote Desktop Users Properties Window
Add all the users who will be logging onto the terminal server and select OK.
End Disconnected Sessions
Sessions that are disconnected and left on the terminal server should be configured to be logged off when they are disconnected. This can be done by user account or by terminal server.
User Account
Configure the desired user accounts by opening the Computer Management console by selecting Start > Programs > Administrative Tools > Computer Management
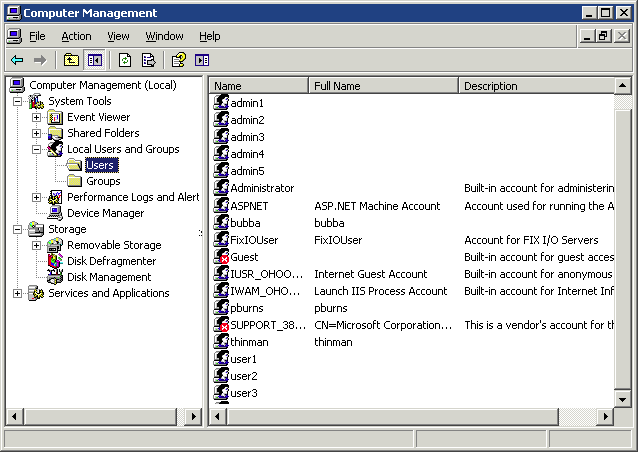
Computer Management
Highlight System Tools > Users and double-click on the desired user to launch the user properties.
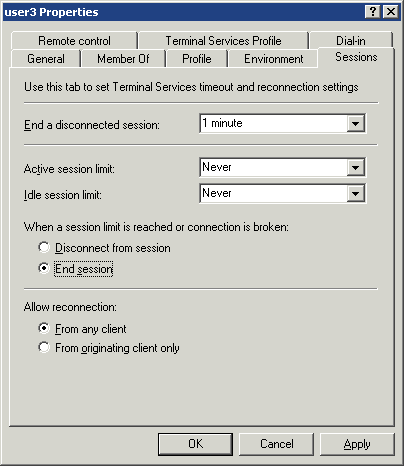
User Properties – Sessions Tab
Select the Sessions tab. Set the End a disconnected session to 1 minute.
Set the When a sessions limit is reached or connection is broken setting to End Session.
Select OK to save the changes.
Terminal Server Settings
The terminal server can be configured to have all the sessions logged off after a disconnect in the RDP-tcp properties. Open the Terminal Services Configuration console by selecting Start > Programs > Administrative Tools > Terminal Services Configuration.
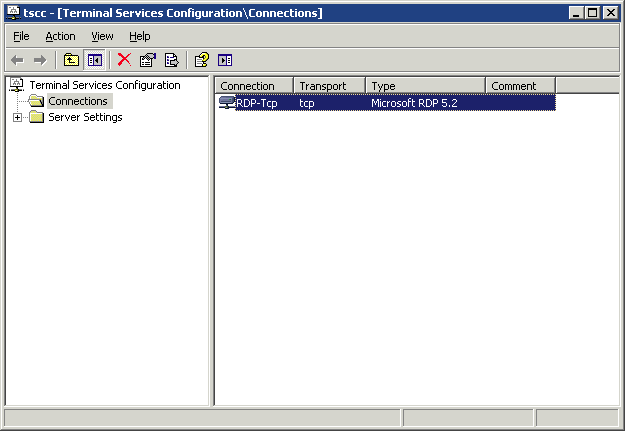
Terminal Services Configuration Console
Highlight Connections and double-click on RDP-tcp to launch the RDP-tcp Properties window.
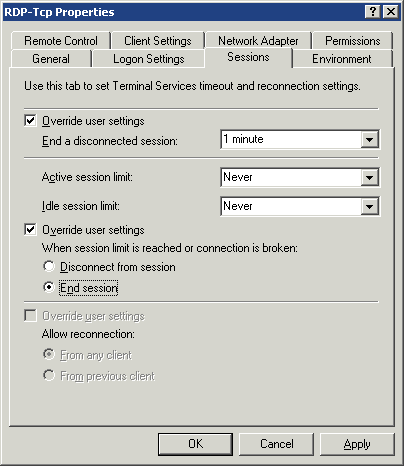
RDP-tcp Properties
Select the Sessions tab. Check the Override user settings checkbox and set the End a disconnected session to 1 minute. Check the Override user settings checkbox and set the When a sessions limit is reached or connection is broken setting to End Session. Select OK to save the changes. This will make every remote RDP user logoff when they disconnect.
Set Relaxed Security
Windows 2000 and Windows 2003 have a Full Security option that can interfere with HMI/SCADA operation. When the 200/2003 Full Security model is used all HMI users will need to be administrators. To allow users to run without being an administrator, set the terminal server to the Relaxed Security based on the NT 4.0 security model. Open the Terminal Services Configuration console by selecting Start > Programs > Administrative Tools > Terminal Services Configuration.
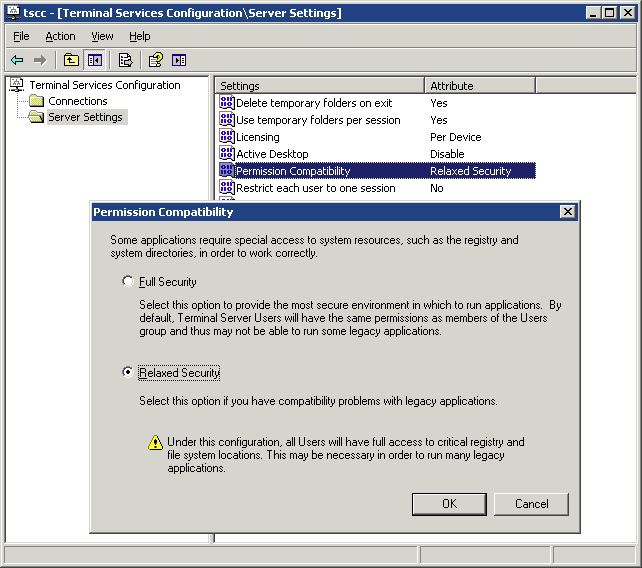
Terminal Services Configuration Console
Highlight the Server Settings on the left and double-click the Permission Compatibility on the right.
Select the Relaxed Security radio button and select OK.
Apply Group Permissions
An iFix Users group must be created and the iFix users must be added and be granted access permission. It is recommended that iFix users be members of the Power User group. Open the Computer Management console by selecting Start > Programs > Administrative Tools > Computer Management.
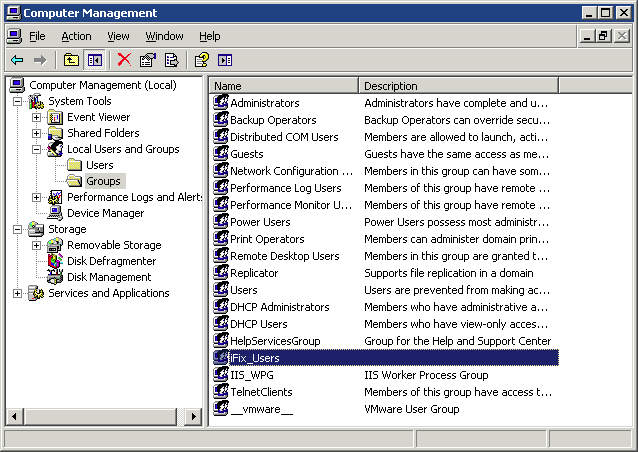
Computer Management
Right-click on Groups and select New Group.
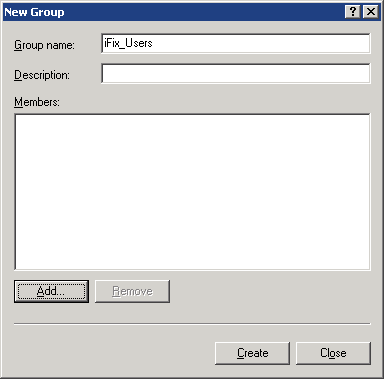
Add New Group
Name the group and add members.
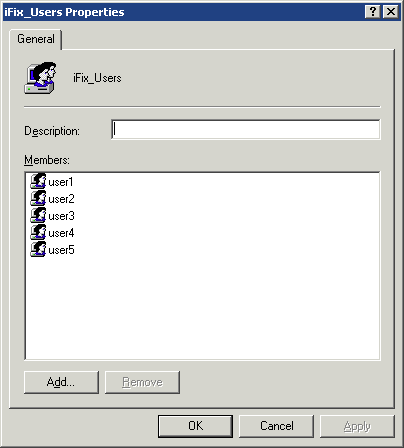
Name the group and add members
Use the Add button to add users.
Add the group to the RDP settings in the Terminal Services Configuration console.
Open the Terminal Services Configuration console by selecting Start > Programs > Administrative Tools > Terminal Services Configuration.

Terminal Services Configuration
Double-click on RDP-tcp to open the RDP-tcp Properties.
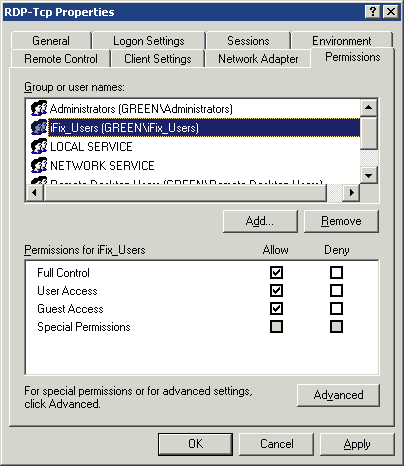
RDP-tcp Properties
Select the Permissions tab. Add the new group by selecting the Add button.
Highlight the new group and set the Full Control, User Access, and Guest Access to Allow.
Select OK to accept changes.